
What is Raspberry Pi?
The Raspberry Pi is a credit-card sized computer that plugs into your TV and a keyboard. It is a capable little PC which can be used for many of the things that your desktop PC does, like spreadsheets, word-processing and games. It also plays high-definition video.
Where can I buy one?
You can buy the Raspberry Pi through Premier Farnell/Element 14 and RS Components. Both distributors sell all over the world.
Raspberry Pi Model A or Model B. What is the difference?
Model A has 256MB RAM, one USB port and no Ethernet (network connection). Model B has 512MB RAM, 2 USB port and an Ethernet port.

Raspberry Pi Basic Hardware Setup
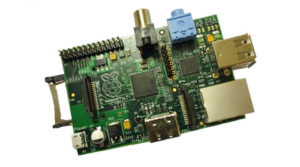
The Raspberry Pi board contains a processor and graphics chip, program memory (RAM) and various interfaces and connectors for external devices. Some of these devices are essential, others are optional. RPi operates in the same way as a standard PC, requiring a keyboard for command entry, a display unit and a power supply.
The following are essential to get started:
- SD card containing Linux Operating system
- USB keyboard
- TV or monitor (with HDMI, DVI, Composite or SCART input)
- Power supply (see Section 1.6 below)
- Video cable to suit the TV or monitor used
Recommended optional extras include:
- USB mouse
- Internet connection, Model A or B: USB WiFi adaptor
- Internet connection, Model B only: LAN (Ethernet) cable
- Powered USB hub
- Case
Connecting Everything Together
- Plug the pre-loaded SD Card into the RPi.
- Plug the USB keyboard and mouse into the RPi, perhaps via a USB hub. Connect the Hub to power, if necessary.
- Plug a video cable into the screen (TV or monitor) and into the RPi.
- Plug your extras into the RPi (USB WiFi, Ethernet cable, external hard drive etc.). This is where you may really need a USB hub.
- Ensure that your USB hub (if any) and screen are working.
- Plug the power supply into the mains socket.
- With your screen on, plug the power supply into the RPi microUSB socket.
- The RPi should boot up and display messages on the screen.
It is always recommended to connect the MicroUSB power to the unit last (while most connections can be made live, it is best practice to connect items such as displays with the power turned off).
The RPi may take a long time to boot when powered-on for the first time
for more info visit http://www.raspberrypi.org
