
If you’re looking for a sleek, stylish, and customizable dashboard for managing your self-hosted applications, Homepage is hard to beat. Its minimalist design and user-friendly interface make setup quick and painless—even if it involves a bit of YAML configuration.
With a few simple tweaks to the YAML config file, you can make Homepage truly your own. Organize your apps into clean stacks, group them under nested tabs, or adjust the look with the built-in color palette switcher in the bottom-left corner to match your personal style.
What makes Homepage truly stand out is its ability to integrate seamlessly with a wide range of self-hosted services. Whether you’re pulling in live data through APIs or your own scripts, Homepage makes it effortless. Want to monitor system performance? Add the Glances widget to display real-time CPU and memory usage—instantly turning your dashboard into a compact monitoring hub. And for those wanting more advanced functionality, the official Homepage Widgets documentation offers clear, in-depth guidance to connect your favorite tools with ease.
In this post I will be outlining on installing and configure Homepage Dashboard using Docker. Docker allows to get Homepage running with a few short commands.
Step1: Preparing the Raspberry Pi to run the Homepage Dashboard
- Install Docker to your Raspberry Pi’s OS. For more information on this refer my earlier post on how to install Docker on Raspberry Pi
- After installing Docker on your Raspberry Pi create a directly where we will store Compose file for Homepage and its config files.
Use the following command for the same.
sudo mkdir -p /opt/stacks/homepage- After creating the directory move into the directly using the following comman\d
cd /opt/stacks/homepageStep2: Writing the Compose file for Homepage
Create Compose file using following command
sudo nano compose.yamlIn the file enter the below configuration lines:
version: "3.3"
services:
homepage:
image: ghcr.io/gethomepage/homepage:latest
container_name: homepage
ports:
- 3000:3000
volumes:
- ./config:/app/config
- /var/run/docker.sock:/var/run/docker.sock:ro
restart: unless-stopped
Step3: Start the Homepage Dashboard on your Raspberry Pi
Next is to start the Homepage Dashboard on Raspberry Pi. For this we will use following commanfd.
docker compose up -d 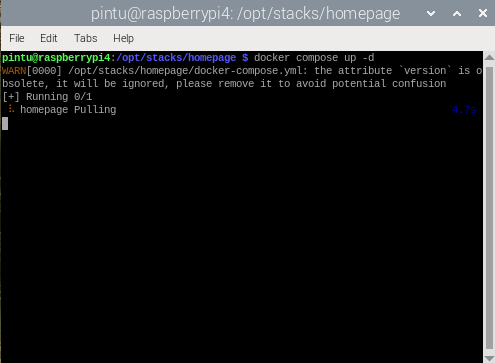
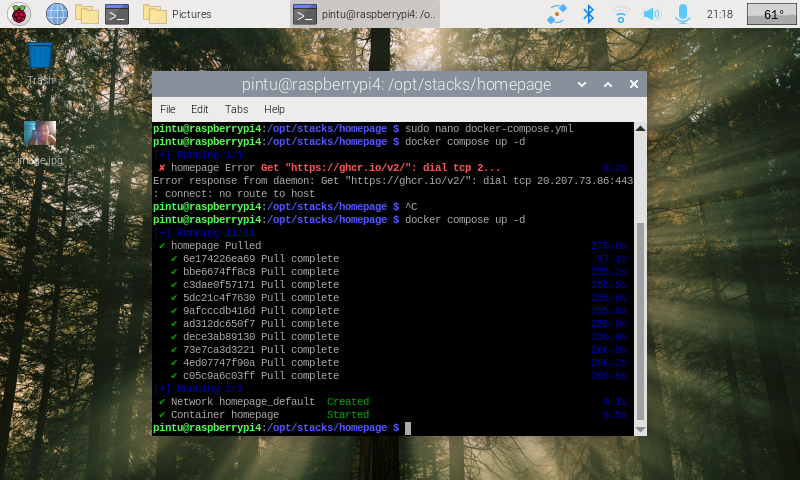
Docker will download the image and immediately begin to run.
Using the “-d” option, Docker will detach from the current terminal session and continue running in the background.
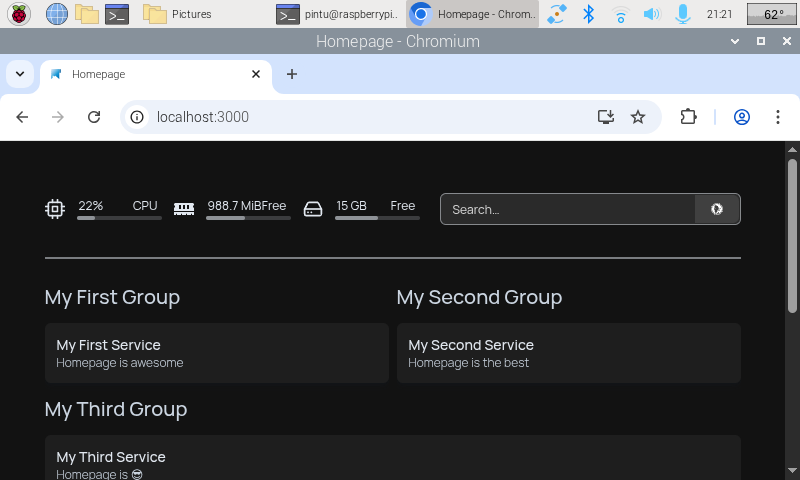
To access the Homepage, use the hostname or ipaddress of the terminal. Getting homepage is easy. Use the following command for the same.
hostname -lor
ip /a to get the ip address
run the following URL in the browser to get to the dashboard.
http://<IP address or hostname>:3000
Step4: Configuring the Homepage Dashboard
The configuration for the Homepage Dashboard on your Raspberry Pi is divided into multiple files.
ls -l /opt/stacks/homepage/configCopyAbove command will show several different files as mentioned below.
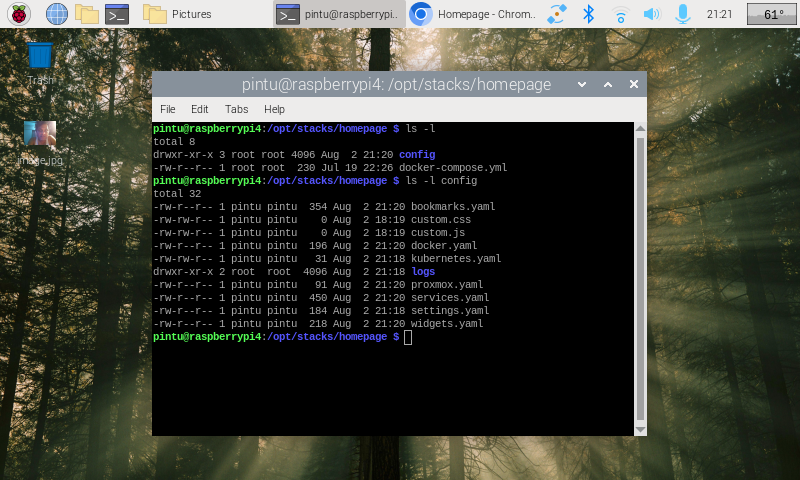
- bookmarks.yaml – Bookmarks are a simple configuration file that allows you to create simple links within your dashboard.
- custom.css – The CSS file allows you to inject your own CSS into the Homepage dashboard on your Raspberry Pi. You can use this to adjust the visuals to match your liking.
- custom.js – The Homepage Dashboard also allows you to inject custom JavaScript. Any code written into this file will be included on your dashboard.
- docker.yaml – To configure the Homepage dashboard to talk with other Docker instances, you will want to use this configuration file.
- kubernetes.yaml – This dashboard can also talk with Kubernetes so that you can include services hosted through that.
- services.yaml – The services file is one that you will likely use quite often. Defining services within this file allows you to monitor whether they are online, and if they are a Docker container, you can track their CPU, Memory, and Network Activity.
- settings.yaml – The settings configuration file allows you to adjust the Homepage Dashboard on your Raspberry Pi. You can use this file to change the title of your home page, set a background image, and more.
- widgets.yaml –The widgets config file allows you to add any of the numerous supported services directly to Homepage.
The above listed files will help you configure Homepage Dashboard as per your requirement.
You can also refer this URL to install and configure Homepage Dashboard using other methods