

WiFi is everywhere around us. Have you ever wondered how many WiFi networks are available nearby and what information they broadcast? In this project, we’ll build a simple WiFi Scanner using an ESP32 development board and Arduino IDE.
This is the first article in a multi-part series where we will gradually transform this basic scanner into a portable handheld WiFi analyzer with display, battery support, data logging, and a web dashboard.
What You’ll Learn
In this tutorial, you’ll learn:
- How to scan nearby WiFi networks using ESP32
- How WiFi scanning works
- Understanding SSID, RSSI, Channel, Security Type, and BSSID
- Using the ESP32 WiFi library
- Displaying scan results in the Serial Monitor
Hardware Components Required
|
Component |
Quantity |
|---|---|
|
ESP32 Dev Board |
1 |
|
USB Cable |
1 |
|
Computer with Arduino IDE |
1 |
No additional sensors or modules required for this project.
Software Required
- Arduino IDE 2.x
- ESP32 Board Package by Espressif Systems
Install ESP32 Board Package
Select ESP32 Dev Module from the Board menu
Open Arduino IDE
Go to Tools → Board → Boards Manager
Search for ESP32
Install ESP32 by Espressif Systems
Understanding WiFi Scan Results
Before writing the code, let’s understand the information returned by a WiFi scan.
SSID
SSID (Service Set Identifier) is the WiFi network name that appears on your phone or laptop.
Example:
- JioFiber
- ACT Fibernet
- TP-Link
RSSI
RSSI (Received Signal Strength Indicator) represents signal strength in dBm.
| RSSI | Signal Quality |
| -30 | Excellent |
| -50 | Very Good |
| -60 | Good |
| -70 | Fair |
| -80 | Weak |
| -90 | Very Weak |
Channel
WiFi routers operate on specific channels. In the 2.4 GHz band, channels 1, 6, and 11 are commonly used because they do not overlap.
Security Type
The scanner can identify:
- Open
- WEP
- WPA
- WPA2
- WPA3
BSSID
BSSID is the MAC address of the wireless access point and uniquely identifies a WiFi device.
ESP32 WiFi Scanner Code
The complete source code is shown below. You can also download from Github repo from the below URL.
https://github.com/pintushaw/WifiScanner
/*
  ------------------------------------------------------------
  Project : ESP32 Portable Wi-Fi Scanner
  Episode : 1 - Basic Wi-Fi Scanner
  Author  : DigitalLab.org
  ------------------------------------------------------------
*/

#include <WiFi.h>

#define SCAN_INTERVAL 10000   // Scan every 10 seconds

void printHeader();
void scanNetworks();
void printNetworkInfo(int index);
String getEncryptionType(wifi_auth_mode_t encryption);

void setup()
{
    Serial.begin(115200);

    delay(1000);

    Serial.println();
    Serial.println("--------------------------------------------");
    Serial.println("ESP32 Portable Wi-Fi Scanner");
    Serial.println("Episode 1");
    Serial.println("--------------------------------------------");

    // Put ESP32 in Station mode
    WiFi.mode(WIFI_STA);

    // Disconnect from any previously connected AP
    WiFi.disconnect(true);

    delay(100);
}

void loop()
{
    scanNetworks();

    Serial.println();
    Serial.println("Next Scan in 10 Seconds...");
    Serial.println();

    delay(SCAN_INTERVAL);
}

/******************************************************
 * Scan nearby Wi-Fi Networks
 ******************************************************/
void scanNetworks()
{
    Serial.println("Scanning nearby Wi-Fi networks...");
    Serial.println();

    int numberOfNetworks = WiFi.scanNetworks();

    if (numberOfNetworks == 0)
    {
        Serial.println("No Wi-Fi Networks Found.");
        return;
    }

    Serial.print("Total Networks Found : ");
    Serial.println(numberOfNetworks);

    printHeader();

    for (int i = 0; i < numberOfNetworks; i++)
    {
        printNetworkInfo(i);
    }

    WiFi.scanDelete();
}

/******************************************************
 * Print Table Header
 ******************************************************/
void printHeader()
{
    Serial.println("--------------------------------------------------------------------------------------------");
    Serial.printf("%-3s %-25s %-8s %-8s %-12s %-20s\n",
                  "No",
                  "SSID",
                  "RSSI",
                  "CH",
                  "Security",
                  "BSSID");
    Serial.println("--------------------------------------------------------------------------------------------");
}

/******************************************************
 * Print Network Information
 ******************************************************/
void printNetworkInfo(int index)
{
    String ssid = WiFi.SSID(index);

    if (ssid == "")
        ssid = "<Hidden>";

    int rssi = WiFi.RSSI(index);

    int channel = WiFi.channel(index);

    String encryption = getEncryptionType(WiFi.encryptionType(index));

    String mac = WiFi.BSSIDstr(index);

    Serial.printf("%-3d %-25s %-8d %-8d %-12s %-20s\n",
                  index + 1,
                  ssid.c_str(),
                  rssi,
                  channel,
                  encryption.c_str(),
                  mac.c_str());
}

/******************************************************
 * Convert Encryption Enum to String
 ******************************************************/
String getEncryptionType(wifi_auth_mode_t encryption)
{
    switch (encryption)
    {
        case WIFI_AUTH_OPEN:
            return "OPEN";

        case WIFI_AUTH_WEP:
            return "WEP";

        case WIFI_AUTH_WPA_PSK:
            return "WPA";

        case WIFI_AUTH_WPA2_PSK:
            return "WPA2";

        case WIFI_AUTH_WPA_WPA2_PSK:
            return "WPA/WPA2";

        case WIFI_AUTH_WPA2_ENTERPRISE:
            return "WPA2-ENT";

        case WIFI_AUTH_WPA3_PSK:
            return "WPA3";

        case WIFI_AUTH_WPA2_WPA3_PSK:
            return "WPA2/WPA3";

        default:
            return "UNKNOWN";
    }
}
Steps to Upload the Sketch
- Connect the ESP32 board to your computer.
- Select the correct COM port.
- Click Upload.
- Open the Serial Monitor.
- Set the baud rate to 115200.
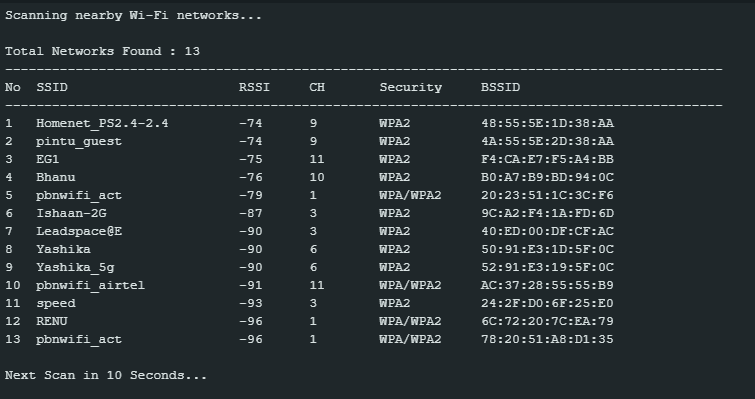
The ESP32 will now scan nearby WiFi networks every 10 seconds.
Sample Output
How WiFi Scanning Works
When the ESP32 performs a scan, it listens for beacon frames transmitted by nearby wireless access points. These beacon frames contain useful information such as:
- Network Name (SSID)
- Security Type
- Channel Number
- MAC Address
- Signal Strength
The ESP32 collects this information and makes it available through the WiFi library.
Video Version
You can watch my youtube video on the same for step by step approach
Conclusion
In this first episode, we successfully built a basic WiFi Scanner using an ESP32. We learned how to scan nearby wireless networks and display useful information such as SSID, RSSI, Channel, Security Type, and BSSID.
This project forms the foundation for a much more advanced handheld WiFi analyzer that we’ll continue building in future episodes.
What’s Next?
In Episode 2, we’ll connect an OLED display and transform this project into a portable WiFi Scanner that can operate without a computer.
Stay tuned for the next part of the series.