
For this project we will be using a ESP32 with 16×2 I2C LCD display, but LCDs with other sizes should also work. The advantage of using an I2C LCD is that the wiring is really simple. You just need to wire the SDA and SCL pins.
Additionally, it comes with a built-in potentiometer you can use to adjust the contrast between the background and the characters on the LCD. On a “regular” LCD you need to add a potentiometer to the circuit to adjust the contrast. If you have 16×2 LCD without I2C driver board, you can modify it by attaching I2C board.
Parts Required
- ESP32 dev board ( or ESP8266 – pinout will change)
- 16*2 I2C LCD ( Note if you have without I2C board then you can merge both. For details refer here)
- Jumper wires and or Breadboard.
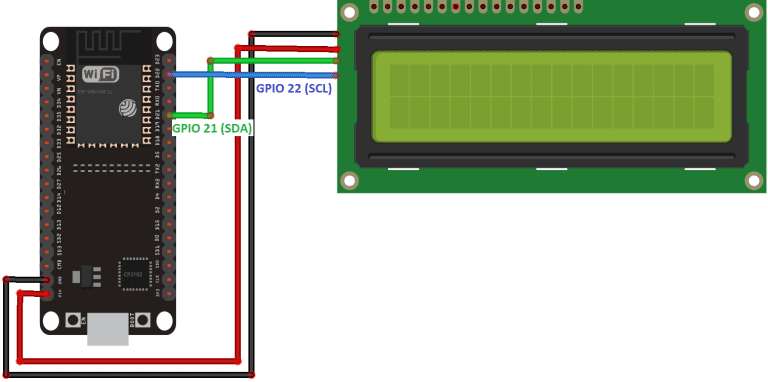
Wiring the LCD to the ESP32
With I2C communication the wiring becomes easy. Wire your LCD to the ESP32 by following the next schematic diagram.
| I2C LCD | ESP32 |
|---|---|
| GND | GND |
| VCC | VIN |
| SDA | GPIO 21 |
| SCL | GPIO 22 |
Wiring the LCD to the ESP8266(OR)
You can also wire your LCD to the ESP8266 by following the next schematic diagram. We are using the ESP8266 default I2C pins (GPIO 4 and GPIO 5).
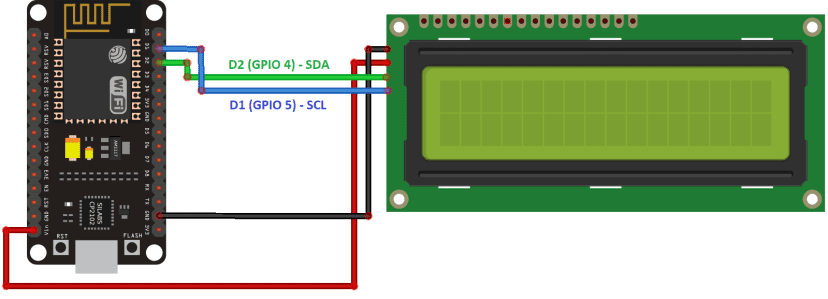
| I2C LCD | ESP8266 |
| GND | GND |
| VCC | VIN |
| SDA | GPIO 4 (D2) |
| SCL | GPIO 5 (D1) |
Preparing the Arduino IDE
Before proceeding with the project, you need to install the ESP32 or ESP8266 libraries
Follow my previous blog on getting started with ESP32 for preparing the Arduino IDE.
Installing the LiquidCrystal_I2C Library -There are several libraries that work with the I2C LCD. We are using library by Martin https://github.com/markub3327/LiquidCrystal_I2C
Once your IDE is ready to work with ESP32 and LCD follow the below steps.
Scan and Find LCD I2C Address
Most LCD uses 0x27 or 0x3F adress but we cannot be sure. Better approach to is to scan an find it. Below is the code for the same.
/*Pintu Shaw - Digitalab.org
Complete project details can be access from ...
Permission is herby granted, free of charge to use it for any project
*/
#include <Wire.h>

void setup() {
Wire.begin(21, 22); // SDA, SCL

Serial.begin(115200);
Serial.println("\nI2C Scanner");

for (byte address = 1; address < 127; address++) {
Wire.beginTransmission(address);

if (Wire.endTransmission() == 0) {
  Serial.print("I2C device found at address: 0x");
  if (address < 16)
    Serial.print("0");

  Serial.println(address, HEX);
}

}

Serial.println("Scan complete");
}

void loop() {
}
Compile and upload the above code. Open the Serial monitor at baud rate of 115200 and press the reset button on ESP32 board. Yo will see the address printed on the monitor.
Next Step – Display Static Text on LCD
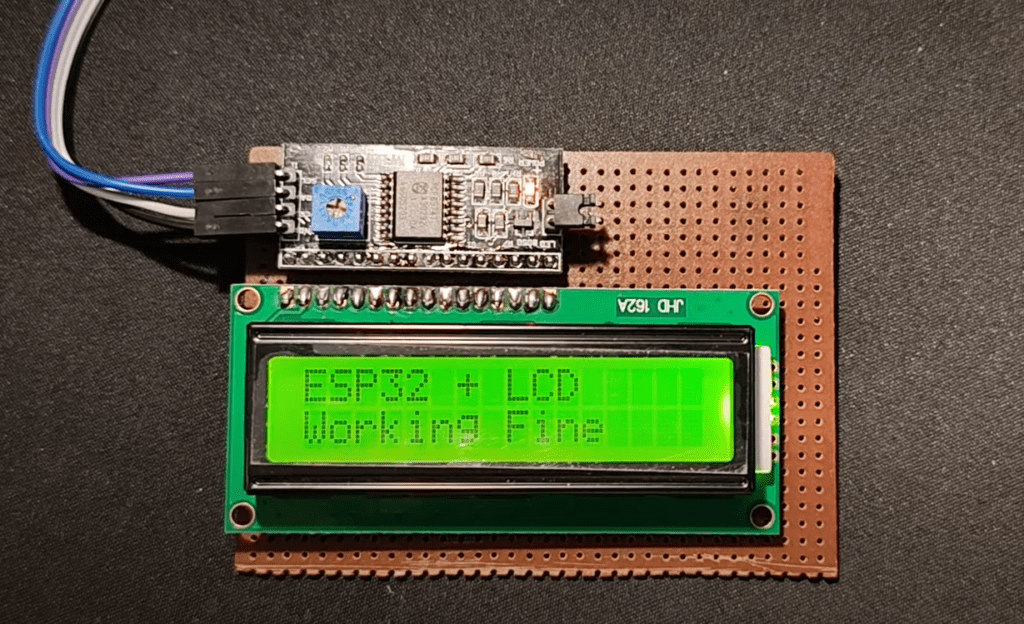
Compile and upload the below code on to ESP32 board after making necessary connection as per the schematic diagram above.
#include <Wire.h>
#include <LiquidCrystal_I2C.h>

LiquidCrystal_I2C lcd(0x27, 16, 2);

void setup() {
  Wire.begin(21, 22);

  lcd.init();
  lcd.backlight();

  lcd.setCursor(0, 0);
  lcd.print("ESP32 + LCD");

  lcd.setCursor(0, 1);
  lcd.print("Working Fine");
}

void loop() {

}
If everything goes well, you should see below output on your LCD.
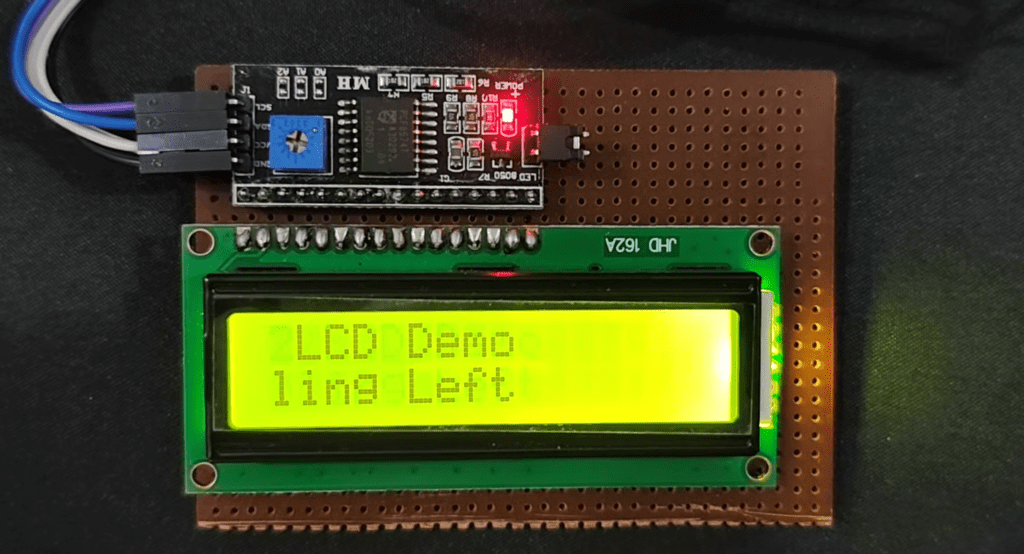
Now if you wan to scroll the text follow the below code.
#include <Wire.h>
#include <LiquidCrystal_I2C.h>

LiquidCrystal_I2C lcd(0x27, 16, 2);

void setup() {
  Wire.begin(21, 22);

  lcd.init();
  lcd.backlight();

  lcd.setCursor(0, 0);
  lcd.print("ESP32 LCD Demo");

  lcd.setCursor(0, 1);
  lcd.print("Scrolling Left ");
}

void loop() {
  lcd.scrollDisplayLeft();

  delay(500);
}
Errors & Troubleshooting
- No output on LCD – check potentiometer on I2C board and adjust the brightness
- Garbageoutput on Serial monitor when checking address – Check the baud rate and should be 115200
- No output on LCD, even no light – Check 5v jumpers may be loose or LCD damaged.
For a detailed step by step process watch my following video on youtube.