

Want to know when a tank is filling up without writing a line of code? In this beginner-friendly project, we build a water level indicator from a few transistors, LEDs, a buzzer and some probes dipped in water. We start with a single-level detector, then expand it to three levels with a warning buzzer at the top.
How it works
Pure water is a poor conductor, but ordinary tap water contains dissolved minerals that let a tiny current flow through it. That’s enough to use as a sensor.
When water touches a probe, a small current flows from the 5V supply through the water and into the base of a 2N2222 transistor. That small base current switches the transistor on, which lets a much larger current flow through the LED. When the water drops below the probe, the current stops and the LED turns off.
The transistor acts as an amplifier here. Water is a weak conductor, and an LED needs more current than water can comfortably supply, so the transistor bridges the gap.
Components used
- CT2N2222A / 2N2222 transistors (one per level)
- Green, yellow and red LEDs
- 1 kΩ resistors
- 4.7 kΩ resistors
- Water probes (bare wires or metal strips also work)
- Active (crystal) buzzer
- 5V power supply
- Breadboard and jumper wires
Step 1: Build a single-level detector
Start with one transistor, one LED and one pair of probes:
- Place a 2N2222 on the breadboard. Its three legs are the emitter, base and collector.
- Connect the emitter to ground.
- Connect the LED, in series with a resistor, between 5V and the collector.
- Connect one probe to 5V. Connect the other probe to the base through a resistor.
- Dip the probes in water. The LED should light.
Lift the probes out and the LED turns off.
Step 2: Experiment with resistor values
This is where the project gets interesting. The resistance of the water changes how much current reaches the base, so the base resistor matters.
We tested 1 kΩ and 4.7 kΩ resistors to see the difference:
- A smaller resistor lets more base current through. The transistor switches on harder and the LED is brighter.
- A larger resistor limits the base current. The LED may be dimmer, or may flicker if the water is a poor conductor.
If your LED is dim or doesn’t light at all, a lower base resistor is the first thing to try.
Step 3: Expand to three levels
Now we repeat the single-level circuit three times, with the probes at different heights in the container:
- Low probe: controls the green LED.
- Medium probe: controls the yellow LED.
- High probe: controls the red LED and the buzzer.
Each level has its own transistor, LED and resistor. The common probe sits at the bottom of the container and is connected to 5V, while the three level probes sit at increasing heights. As the water rises, it reaches each probe in turn and switches on that transistor.
Circuit & Schematic Diagram
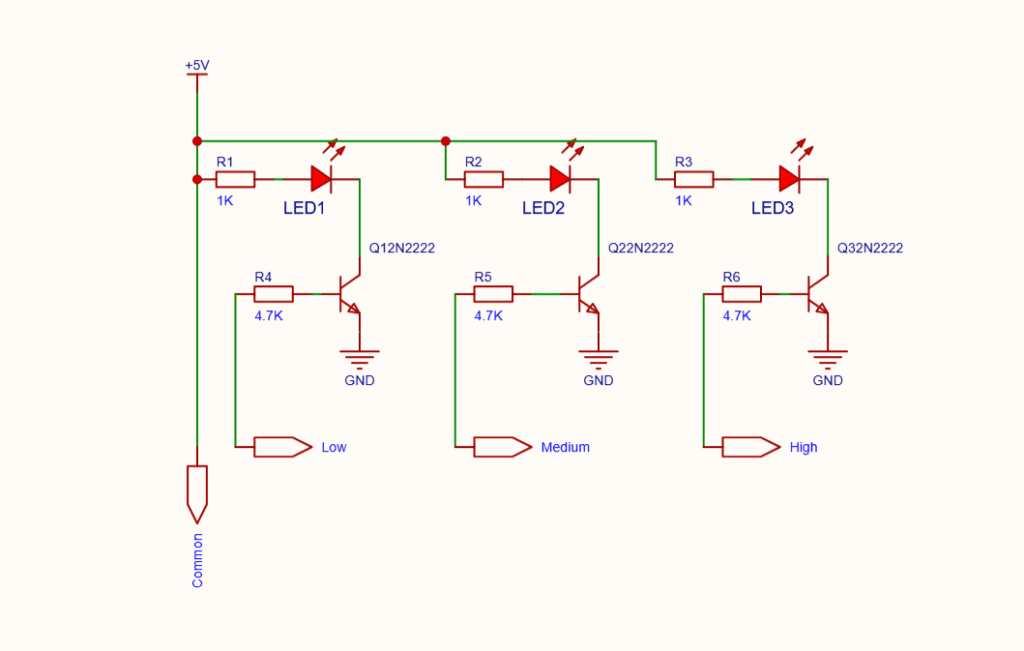
The lower LEDs stay on
The indicator is cumulative. When the water rises to a higher level, the lower probes are still underwater, so they keep conducting and their LEDs stay lit. You never lose the lower indications as the tank fills; you just add more.
| Water level | Green LED | Yellow LED | Red LED | Buzzer |
|---|---|---|---|---|
| Below low probe | Off | Off | Off | Off |
| 🟢 Low | On | Off | Off | Off |
| 🟡 Medium | On | On | Off | Off |
| 🔴 High | On | On | On | On |
This makes the display easy to read at a glance: one LED means low, two means medium, and all three plus the buzzer means the tank is full.
Step 4: Add the buzzer
For the high-level warning, connect an active buzzer in the collector path of the third transistor, alongside the red LED. An active buzzer has a built-in oscillator, so it sounds as soon as it gets power, with no extra components or code. When the water reaches the top probe, the red LED lights and the buzzer tells you the tank is full.
What you’ll learn
- How water can work as a simple electrical sensor
- How a 2N2222 transistor works as an electronic switch
- How to detect different water levels
- How resistor values affect transistor switching
- How to control LEDs and a buzzer with transistors
Troubleshooting
- LED never lights: Check the transistor orientation. The flat side and pinout matter. Also try a smaller base resistor.
- LED is very dim: The water may be too pure. Tap water works much better than distilled water.
- LED stays on after you remove the probes: Wet probes or a water bridge between them can keep a small current flowing. Dry the probes or space them further apart.
- Probes corrode over time: This is normal with DC current in water. Use stainless steel or other corrosion-resistant probes for anything long-term, and take them out of the water when you’re not testing.
Safety note
This circuit runs on 5V, which is safe for experiments. Never connect mains voltage to a water-sensing circuit, and keep your breadboard and power supply dry.
Watch the build
I walk through the whole project step by step in the video:
If you’d like to see more beginner electronics projects where we build real circuits and learn by experimenting, subscribe to the channel. Have questions or ideas for the next build? Leave them in the comments.