
To Connect 16*2 LCD Display Arduino Uno we will use the previous project to capture temperature and display on console.
Parts required for the project:
- Arduino IDE to program the code and upload
- OneWire and DallasTemperatre library for the Arduino and DS18B20
- One DS18B20 digital temperature sensor
- Arduino UNO R3
- 16*2 LCD display
- Jumper wires
- Breadboard/PC/General purpose board
- Arduino UNO cable
- wires
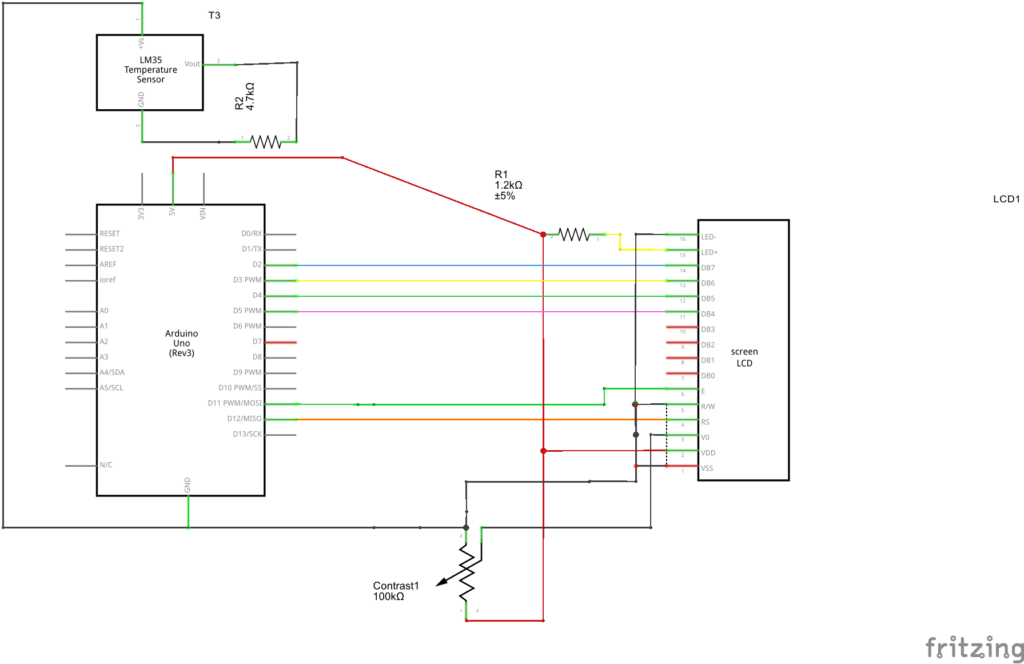
Steps 1: Wiring Arduino and DS18B20
- The wiring, of a 1-wire interface, is super simple.
- The GND pin of the DS18B20 goes to GND on the Arduino. [black]
- The Vdd pin of the DS18B20 goes to +5V on the Arduino. [red]
- The Data pin of the DS18B20 goes to a (digital) pin of your choice on the Arduino, in this example I used Pin 7
- Add a pull-up resistor of 4.7 KΩ. as shown in the schematic diagram. One end of resistor connecting Vdd and another end connecting data pin.
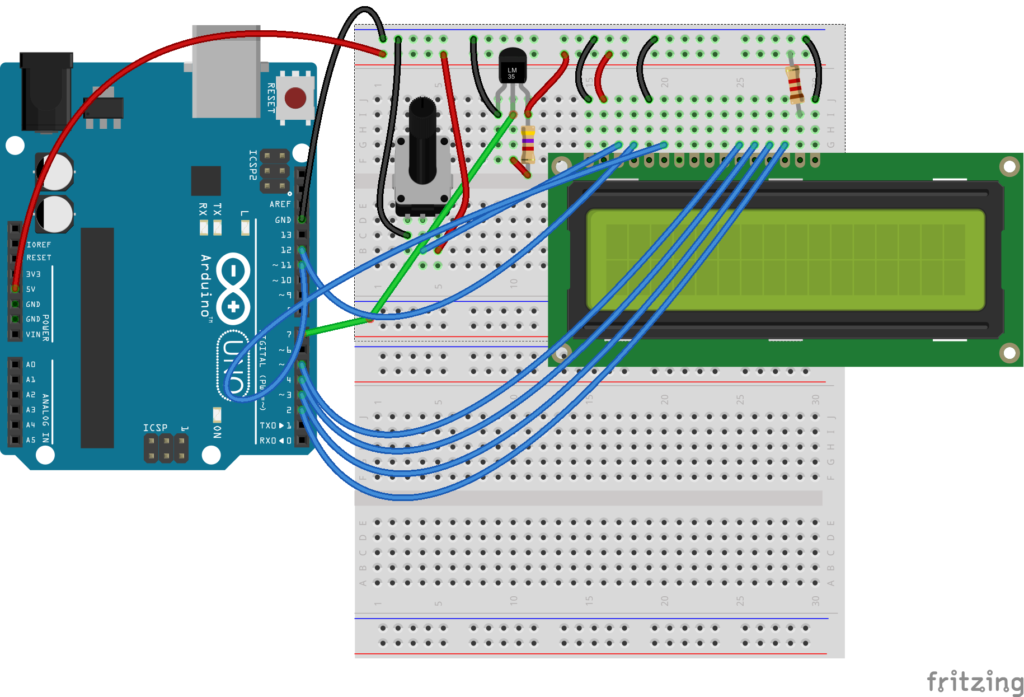
Step 2: Connecting the LCD display
- VSS –> GND Arduino
- VDP –> 5V Arduino
- VO –> output potentiometer (potentiometer VCC -> 5V Arduino, potentiometer GND -> Arduino GND).
- RS –> pin 12 Arduino
- RW –> GND Arduino
- E –> pin 11 Arduino
- D4 –> pin 5 Arduino
- D5 –> pin 4 Arduino
- D6 –> pin 3 Arduino
- D7 –> pin 2 Arduino
- A –> 5V Arduino with 1.2 k resistor
- K –> GND Arduino
Step 3: WRITING CODE AND UPLOADING

#include<OneWire.h>
#include<DallasTemperature.h>
#include<LiquidCrystal.h>

// Data wire is plugged into digital pin2
#define ONE_WIRE_BUS 7
OneWire oneWire(ONE_WIRE_BUS);
DallasTemperature sensors(&oneWire);
//LCD display pins
LiquidCrystal lcd(12, 11, 5, 4, 3, 2);
double temperature;
void setup(void)
{
 Serial.begin(9600);
 //Serial.println("Temperature Demo");
 sensors.begin();
 lcd.begin(16, 2);
 lcd.print("hello, WORLD");

}
void loop()
{
 sensors.requestTemperatures(); // send command to get temperatures
 delay(500);
 temperature= sensors.getTempCByIndex(0);
 delay(1000);
 lcd.display();
 lcd.setCursor(0, 1);
 lcd.print("Temp: ");
 lcd.setCursor(7, 1);
 lcd.print(temperature);
 lcd.print(" C");

}
Screenshot of the Project output

