In this post we will HACK ATX power supply to use it as a bench top power supply which can be used for different electronics projects.
Parts needed
- An ATX Power supply. You can salvage from your old desktop computer.
- Drill
- Needle Noespliers
- Soldering iron
- Heat shink tube
- On/Off Switch
- RED and Green LED
- Binding Posts – 1 black , 5 red
- 5 Watt 10 Ohm resistance
!!!ATTENTION: do not attempt to disassemble or touch any of the circuits inside the power supply case unless it is disconnected from the MAINS POWER. After disconnecting from mains wait for few minutes to discharge the capacitors.
Test the power supply
In order to do so, you will have to short the GREEN wire that goes inside the big connector to ground (ground can be any of the black wires). The power supply should turn on. Check the voltage for each wire.
Note: All ATX power supply will have voltage and power ratings printed.Power rating will be different for different power supply.
| Orange | 3.3 v | 16 A |
| RED | +5 v | 25 A |
| Yellow | +12 v | 18 A |
| Blue | -12 v | 0.5 A |
| White | -5v | 0.5 A |
| Purple | +5v SB | 0.5 A |
| Green | Power on |
Steps
- Trim and cut the wire short
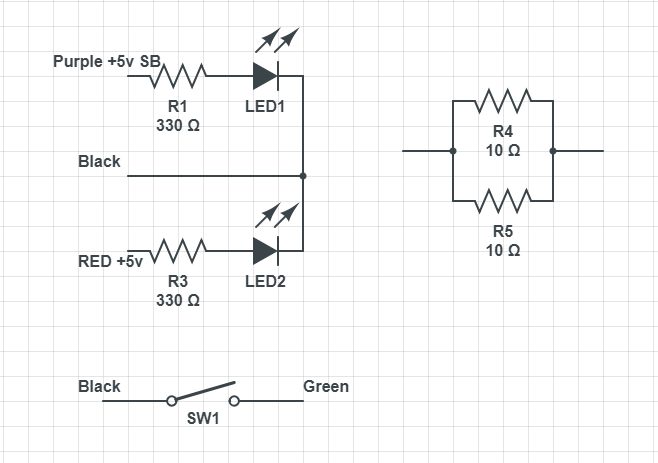
- Connect on/off switch to Green and black wire
- Connect Red LED to Purple ( standby power) along with 330 ohm resistance
- Connect Green LED to red wire alogn with 330 ohm resistance.
- Connect dummy load to highest rated power supply. In my case it was +5v ( RED). I used 2 5 watt 10 ohm resistance in Parallel ( 10 watt 5 ohm).
- Join the remaining wires to different Binding post. Black wires to black and other wires to different binding post as shown in the image.


In the above modification we can also add an USB connector so that it can be use to charge mobile phones as well.

