Summary
In this post we will how we can control servo motor using Raspberry Pi Pico. I will use PWM (Pulse Width Modulation) in Raspberry Pi Pico to rotate and control Servo Motor. Pulse-width modulation (PWM) is used for controlling the amplitude of digital signals in order to control devices and applications requiring power or electricity. We will also learn how to interface Servo with the Raspberry Pi Pico RP2040 Microcontroller. The MicroPython Code along with the Servo library can rotate the Servo Motor in the desired direction.
If you have not used Raspberry Pi PICO, you can refer my post on getting started with Raspberry PI PICO.
Parts Required
- Raspberry PI Pico Board
- Servo Motor
- Breadboard
- Jumper Wires
- Micro USB cable
What is Servo Motor ?
Servo motors have three wires: power, ground, and signal. The power wire is typically red. The ground wire is typically black or brown and should be connected to a ground pin on the board. The signal pin is typically yellow or orange.
A servo motor is a type of motor that can rotate with great precision. Normally this type of motor consists of a control circuit that provides feedback on the current position of the motor shaft, this feedback allows the servo motors to rotate with great precision. If you want to rotate an object at some specific angles or distance, then you use a servo motor. It is just made up of a simple motor which runs through a servo mechanism. If motor is powered by a DC power supply then it is called DC servo motor, and if it is AC-powered motor then it is called AC servo motor.
It consists of three parts:
- Controlled device
- Output sensor
- Feedback system
Servos have three wires coming out of them. Out of which two will be used for Supply (positive and negative) and one will be used for the signal that is to be sent from the MCU.
Here is another post on controlling Servo motor using Arduino.
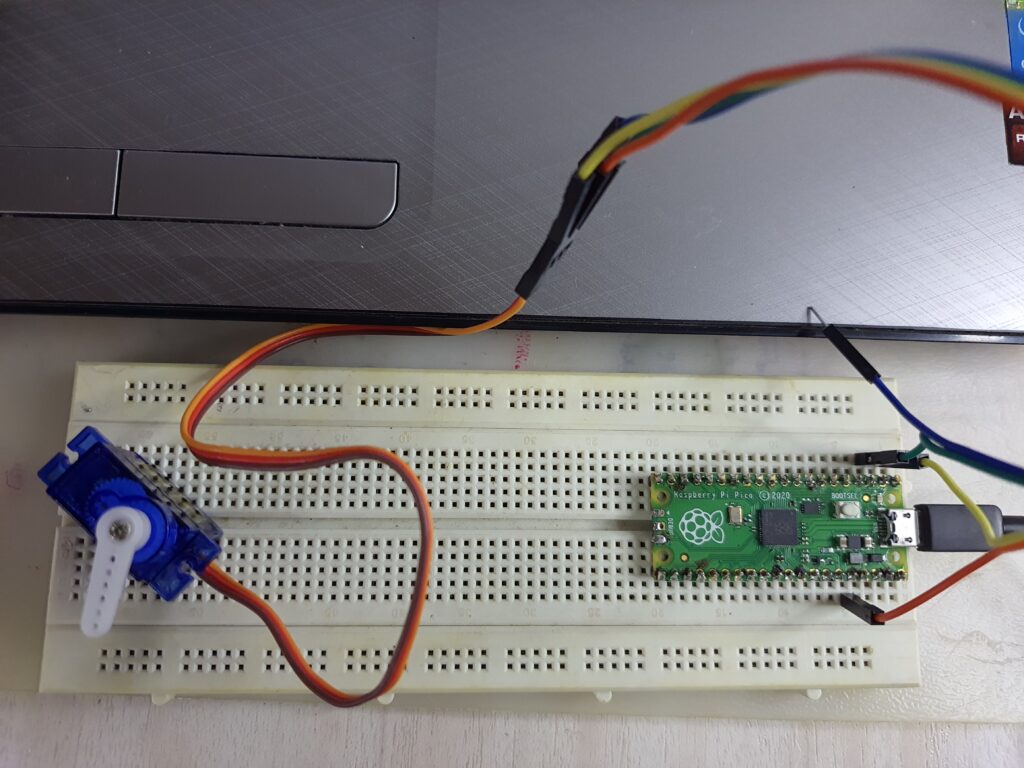
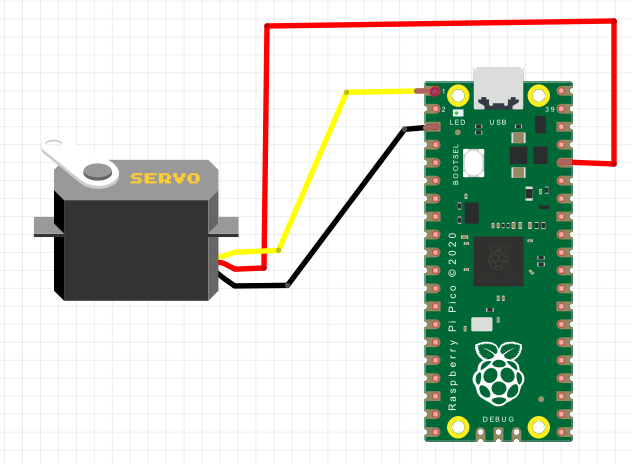
Circuit Diagram and Connections
Connect the VCC, GND & Signal Pin of the Servo Motor to the 3.3V, GND & GP0 pin of the Raspberry Pi Pico as shown below.
Code
Servo.py
from machine import Pin, PWM

class Servo:
    """ A simple class for controlling a servo with the Raspberry Pi Pico.

    Attributes:

        minVal: An integer denoting the minimum duty value for the servo motor.

        maxVal: An integer denoting the maximum duty value for the servo motor.

    """

    def __init__(self, pin: int or Pin or PWM, minVal=2500, maxVal=7500):
        """ Creates a new Servo Object.

        args:

            pin (int or machine.Pin or machine.PWM): Either an integer denoting the number of the GPIO pin or an already constructed Pin or PWM object that is connected to the servo.

            minVal (int): Optional, denotes the minimum duty value to be used for this servo.

            maxVal (int): Optional, denotes the maximum duty value to be used for this servo.

        """

        if isinstance(pin, int):
            pin = Pin(pin, Pin.OUT)
        if isinstance(pin, Pin):
            self.__pwm = PWM(pin)
        if isinstance(pin, PWM):
            self.__pwm = pin
        self.__pwm.freq(50)
        self.minVal = minVal
        self.maxVal = maxVal

    def deinit(self):
        """ Deinitializes the underlying PWM object.

        """
        self.__pwm.deinit()

    def goto(self, value: int):
        """ Moves the servo to the specified position.

        args:

            value (int): The position to move to, represented by a value from 0 to 1024 (inclusive).

        """
        if value < 0:
            value = 0
        if value > 1024:
            value = 1024
        delta = self.maxVal-self.minVal
        target = int(self.minVal + ((value / 1024) * delta))
        self.__pwm.duty_u16(target)

    def middle(self):
        """ Moves the servo to the middle.
        """
        self.goto(512)

    def free(self):
        """ Allows the servo to be moved freely.
        """
        self.__pwm.duty_u16(0)
Main.py
1 import utime
2 from servo import Servo
3
4 s1 = Servo(0) # Servo pin is connected to GP0
5
6 def servo_Map(x, in_min, in_max, out_min, out_max):
7 return (x - in_min) * (out_max - out_min) / (in_max - in_min) + out_min
8
9 def servo_Angle(angle):
10 if angle < 0:
11 angle = 0
12 if angle > 180:
13 angle = 180
14 s1.goto(round(servo_Map(angle,0,180,0,1024))) # Convert range value to angle value
15
16 if __name__ == '__main__':
17 while True:
18 print("Turn left ...")
19 for i in range(0,180,10):
20 servo_Angle(i)
21 utime.sleep(0.05)
22 print("Turn right ...")
23 for i in range(180,0,-10):
24 servo_Angle(i)
25 utime.sleep(0.05)