

In the previous episodes of the ESP32 Portable Wi-Fi Scanner project, we built the project step by step.
In Episode 1, we created a basic Wi-Fi scanner that displayed nearby networks on the Serial Monitor.
In Episode 2, we added a 2.8-inch TFT display and built the graphical display framework using the ST7789 controller.
In Episode 3, we combined the Wi-Fi scanner with the TFT display and created a working graphical Wi-Fi scanner.
Now, in Episode 4, we take another major step toward making the project a portable wireless scanner.
We add two important features:
- Bluetooth Low Energy (BLE) scanning
- Battery support using an 18650 Li-ion battery and TP4056 charging module
What We Are Building
The ESP32 has built-in support for both Wi-Fi and Bluetooth Low Energy, which makes it an excellent platform for creating a compact wireless scanner.
With the additions in this episode, our project can now scan for:
- Wi-Fi networks
- BLE devices
The TFT display provides a convenient way to view the scan results.
We also add battery power so the project no longer needs to remain connected to a USB cable during normal operation.
Project Evolution
The project has now evolved through four stages.
EP1 – Basic Wi-Fi Scanner
We started with a simple ESP32 Wi-Fi scanner. The results were displayed through the Serial Monitor.
EP2 – TFT Display Framework
We introduced the 2.8-inch TFT display and configured the ST7789 driver. This episode focused mainly on creating the graphical display framework.
EP3 – Wi-Fi Scanner + TFT
We combined the Wi-Fi scanner with the TFT interface. The display now showed information such as:
- SSID
- RSSI
- Channel
- Security
We also solved an important hardware issue where the TFT would occasionally turn white during repeated Wi-Fi scans.
EP4 – Wi-Fi + BLE + Battery
In this episode, we extend the project by adding:
- BLE scanning
- BLE device information
- Battery support
- 18650 Li-ion battery
- TP4056 charging module
Adding Battery Support
Until now, the project was primarily powered through USB. That is convenient during development, but it isn’t ideal for a portable scanner.
To make the project portable, we added an 18650 Li-ion battery and a TP4056 charging module.
The basic idea is:
18650 Li-ion Battery
│
▼
Power Circuit
│
▼
ESP32
│
├── TFT Display
└── Wi-Fi / BLE
The TP4056 module provides a convenient way to charge a single-cell Li-ion battery.
Why Battery Support Matters
Adding a battery changes the project significantly.
Previously:
ESP32 + TFT
│
USB
│
Power
Now:
   18650
      │
      ▼
   TP4056
      │
      ▼
    ESP32
      │
      ▼
     TFT
This allows the scanner to be used as a handheld device rather than being permanently connected to a computer.
It also makes testing much more convenient because the scanner can be carried around while scanning different locations.
Adding BLE Scanning
The ESP32 includes Bluetooth Low Energy functionality in addition to Wi-Fi. This makes it possible to discover nearby BLE devices without adding a separate Bluetooth module. The BLE scanner searches for advertising devices in the surrounding area.
Depending on the device, the scan will provide information such as:
- Device name
- Bluetooth address
- RSSI
- Number of detected devices
The RSSI value provides an indication of the received signal strength.
BLE Information on the TFT
The TFT display is used to present the BLE scan results.
A typical BLE scan can look like:
| BLE Device | RSSI |
|---|---|
| Unknown | -95 |
| BLE Device | -90 |
| Sensor | -88 |
| Tracker | -83 |
Not every BLE device necessarily broadcasts a readable name. Therefore, it is normal to see entries such as:
Unknown
or an address instead of a device name. This depends on what information the BLE device includes in its advertising packets.
Wi-Fi and BLE
One of the advantages of using the ESP32 is that we don’t need separate hardware for Wi-Fi and BLE scanning. The ESP32 provides both wireless technologies on the same chip.
This makes the project considerably more compact.
Portable Enclosure
For this version, the components are assembled into a compact enclosure.
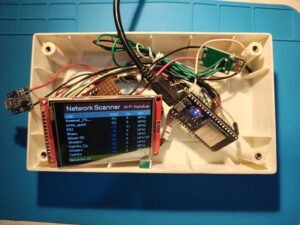
The current prototype contains:
- ESP32 development board
- 2.8-inch TFT display
- TP4056 charging module
- 18650 battery
- Wiring and supporting components
The enclosure is still a prototype rather than a finished product. It will be completed once we include all the features in the Project.
Wi-Fi Scanner Display
No change in Wi-Fi Scanner display from EP3
BLE Scanner Display
The BLE screen uses a similar concept.
| BLE Device | RSSI |
|---|---|
| Unknown | -95 |
| BLE Device | -90 |
| Sensor | -88 |
| Tracker | -83 |
Testing the Portable Scanner
Once the BLE scanner and battery support were added, the next step was to test the complete system.
The test verifies that:
- ESP32 starts correctly
- TFT initializes correctly
- Wi-Fi scanning works
- BLE scanning works
- Scan results appear on the display
- Battery power can operate the system
- The charging circuit can be used to recharge the battery
The device can now be disconnected from the USB cable and used as a portable scanner, subject to the battery/power arrangement used in the prototype.
Hardware Used
The main hardware for this episode includes:
- ESP32 DevKit board
- 2.8-inch 240×320 TFT display
- ST7789 TFT controller
- 18650 Li-ion battery
- TP4056 charging module
- Jumper wires
- Prototype enclosure
The same TFT setup from Episode 3 is retained.
Software Used
The project continues to use:
- Arduino IDE
- ESP32 board package
- TFT_eSPI library
- ESP32 Wi-Fi functionality
- ESP32 BLE functionality
The display continues to use the ST7789 configuration developed in Episode 2. Source code you can download from github repo : https://github.com/pintushaw/WifiScanner
What We Learned
Episode 4 introduces several important concepts:
1. ESP32 Dual Wireless Capability
The ESP32 can handle both Wi-Fi and BLE, making it possible to build multi-purpose wireless projects without additional radio modules.
2. BLE Scanning
We learned how to discover nearby BLE advertising devices and retrieve information such as device name, address and RSSI.
3. Battery-Powered ESP32
Adding a rechargeable battery changes the project from a USB-powered development setup into a potentially portable device.
4. Hardware Integration
The project now combines several subsystems:
- ESP32
- TFT
- Wi-Fi
- BLE
- Battery
- Charging circuit