
In this post we will see how to build a Face Recognition system using Raspberry Pi and OpenCV library. Below is step by step guide to help you achieve the same.
Prerequisites
For this project you will need following:
- A Raspberry Pi ( Preferable Pi4 or later for better performance)
- Raspberry Pi camera Module or USB Web cam
- Power supply for Raspberry Pi
- Monitor, Keyboard and Mouse or Remote access using SSH or Screensharing using raspberry pi connect
- Python installed on the Raspberry Pi
- Libraries: OpenCV, Dlib, face recognition
Step 1 – Install Required Libraries
To perform face recognition, you’ll need to install the following libraries:
- OpenCV: For image processing
- Dlib: For face detection
- face_recognition: Simplified face recognition library built on Dlib
Run the following commands to install them:
<TBD>
# Update and upgrade the system
sudo apt update
sudo apt upgrade
# Install OpenCV and dependencies
sudo apt install python3-opencv
# Install Dlib
sudo apt install cmake
sudo apt install libopenblas-dev liblapack-dev libx11-dev libgtk-3-dev
pip3 install dlib
# Install the face_recognition library
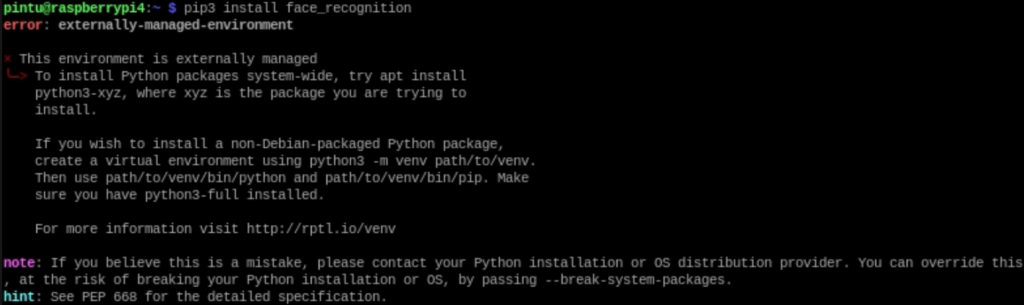
pip3 install face_recognition
pip3 install opencv-pythonNote: If you get following error while installing dlib then create python virtual environment and then proceed.


Step 3 – Setting Up the Camera
Test your camera to ensure that it is working. For Raspberry Pi camera module, enable the camera interface:
Sudo raspi-config [ Go to Interface Options > Camera > Enable and then restart ]Test the camera:
raspi-still -o test.jpg
or libcamera-still -o test_apple.jpg
fswebcam test.jpg [for web camera]Step 4 – Face Recognition Code
Below is the basic script for face recognition:
import face_recognition
import cv2
import numpy as np
# Initialize the camera
video_capture = cv2.VideoCapture(0)  # Use 0 for the default camera
length = int(video_capture.get(cv2.CAP_PROP_FRAME_COUNT))
# Load a sample picture and learn how to recognize it
known_image = face_recognition.load_image_file("test_pintu.jpg")
known_face_encoding = face_recognition.face_encodings(known_image)[0]
# Create arrays of known face encodings and their names
known_face_encodings = [known_face_encoding]
known_face_names = ["Pintu Shaw"]
#while True:
for i in range(1,length-1):
# Capture a single frame from the video
    ret, frame = video_capture.read()
    if frame is None:
        print('None')
        break
# Convert the frame from BGR to RGB (OpenCV uses BGR by default)
    rgb_frame = frame[:, :, ::-1]
# Find all the face locations and encodings in the current frame
    face_locations = face_recognition.face_locations(rgb_frame)
    face_encodings = face_recognition.face_encodings(rgb_frame, face_locations)
    for (top, right, bottom, left), face_encoding in zip(face_locations, face_encodings):
        # Check if the face matches any known face
        matches = face_recognition.compare_faces(known_face_encodings, face_encoding)
        name = "Unknown"
        if True in matches:
            first_match_index = matches.index(True)
            name = known_face_names[first_match_index]
# Draw a box around the face
            cv2.rectangle(frame, (left, top), (right, bottom), (0, 0, 255), 2)
# Label the face
            cv2.rectangle(frame, (left, bottom - 35), (right, bottom), (0, 0, 255), cv2.FILLED)
            font = cv2.FONT_HERSHEY_DUPLEX
            cv2.putText(frame, name, (left + 6, bottom - 6), font, 0.5, (255, 255, 255), 1)
# Display the video feed
    cv2.imshow('Video', frame)
# Break the loop with 'q'
    if cv2.waitKey(1) & 0xFF == ord('q'):
        break
# Release the camera and close windows
video_capture.release()
cv2.destroyAllWindows()
Step 4 – Running the code
- Save the script as face_recognition.py.
- Replace “known_face.jpg” with the image of the person you want the system to recognize.
- Run the script:
- python3 face_recognition.py
- The script will:
- Detect faces in the video feed.
- Compare them with the known face(s).
- Display the result in real-time.
Conclusion
The above code is very basic and can be improved to support list of known images. Also, we can store log of timestamps instead of displaying in real time for detected faces and unknown faces..